Archive for June, 2007
June 29, 2007

Post Card, originally uploaded by fmirela.
I got the idea of making post cards out of some colorful binders that where laying around.
Make them yourselves!
Offer a cute post card to your colleagues, the girl/boy in the other cubicle you really like, your surfer buddies, your mom…someone close and dear to you.
View more on Flickr and read my instructable!
Posted in Craft, DIY | Leave a Comment »
June 22, 2007
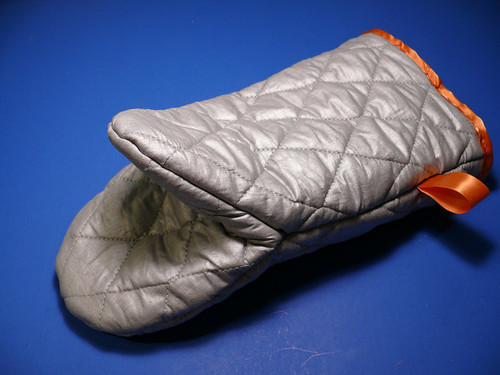
Quilted Silver Oven Mitt, originally uploaded by fmirela.
This item helps humans handle hot things in and out of the oven, protecting their delicate flesh from burns.
It is easy to hang in handy close to the over and it will look good in anyone’s kitchen, including yours, your moms or your sweetheart. Keep it close by when grilling your favorite barbecue.
Buy it from Everywear!
Or make your own, following this HOT TUTORIAL.
Posted in Clothing, Craft, DIY, Fabric, Sewing Ideas, Sewing Projects, Sewing Tips | 3 Comments »
June 18, 2007
Want very neat, fresh and cool craft/sewing/recycling ideas?
Lately I’ve been having so much fun watching these amazing clever videos on YouTube from

AWESOME!
P.S. In episode 12 there’s an interview with the creators of BurdaStyle and there’s a screenshot (minute 4:18) where my creations appear 🙂
Posted in Clothing, Craft, DIY, Fabric, Fashion, Jewelry, Sewing Ideas, Sewing Projects | 6 Comments »
June 8, 2007

Red Denim Sunhat, originally uploaded by fmirela.
I sewed decorative circular stitches on the border of the hat, using the chainstitch from the overlock machine.
Matches perfect with the red denim dress and skirt!
It offered me much needed shade in the Valley of Fire, NV.
Posted in Clothing, Craft, DIY, Fabric, Fashion, Sewing Ideas, Sewing Projects, Sewing Tips | 3 Comments »
June 5, 2007
Here are the steps I have followed to sew a shirt collar (on the red jeans dress).
Cut out collar and collar stand pieces based on your pattern.
You should end up having 2 collar pieces and 2 collar stand pieces.
I like to make the collar piece that will be on top a little bigger than the other, so that it allows the fabric to fold nicely when the collar is done. Notice this in the next picture. I insert a pin as a mark into the larger collar piece so I know it is going to be on top.
 |
Place right collar sides together and interfacing on the back.Start sewing from the neck edge. when you reach the collar point slow down, check that you have gone far enough, simply by leaving the needle in the fabric, lift the presser foot and turn around, stitch thought the center of the collar. You can sew all around if the fabric does not stretch, or stop at the center, turn the collar and do the same seam starting from the other edge, turning and continuing to the center. |
 |
To turn the collar, grade the seams to reduce the bulk of the fabric. Cut the interfacing close to the seam-line. Cut about half of the seam allowance for the middle layer. You get a nice flat seam to topstitch on.
Cut the corner close to the point seam, careful not to cut the seam. |
 |
Turn it around. Push the tip with something narrow and hard, to get a crisp corner. Hand press the seam so that the seam is rolled towards the back.
|
 |
Topstitch the collar. Guide the seam with the foot leg. Leave the needle in at the corners, lift the presser foot, turn, let down the presser foot and stitch. |
 |
The topstitching will give your collar a nice finished look. |
 |
Attaching collar stand (band) to collar: Match the marks on the stand, at the tip of the stand, with the edge of the collar. Put a layer of interfacing if you want. My fabric was stiff as it was, so I did not add the interfacing. Place the collar in between the collar bands, the collar bands should face the collar. Sew. |
 |
When you have a straight seam and a drastic curve, you have to cut small clips (or clip the seam) in the seam and going a thread or two to the seam line (careful not to cut the seam line). This will give you enough stretch for the fabric can lay smoothly. |
 |
Press this seam.Next is attaching the collar stand to the shirt.
The shirt back and front are attached at the shoulder lines. Sew a stay seam around the neckline, as it is curved and it will distort otherwise. |
 |
Match the marks on the collar bands to the shoulder seam (not the topstitching) of the shirt.Start sewing on the seam line on the collar stand. Straighten the ruffles that are created underneath the seam.
Turn the seam allowance inside and press it under towards the top of the collar. Pin the stand around, along the stitch that attached the stand to the shirt.
You can now hand stitch it or machine stitch it, topstitching it from the wrong side (backstitch at the ends). |
All done! Have fun sewing yours!
Posted in Blouse, Clothing, Craft, DIY, Fabric, Fashion, Sewing Ideas, Sewing Projects, Top | 9 Comments »


